개발/Spring
[Spring Boot] Spring Security 로그인기능 구현하기
Jindory
2022. 1. 29. 09:03
반응형
자주 사용하는 Spring Security의 사용법에 대해 정리해보려고 합니다.
전체 코드는 Github에 올라가 있으니 참고 바랍니다.
- 개발환경
- Java Eclipse 2021.12
- Java 11
- SpringBoot 2.6.3
- Gradle
- 라이브러리
- org.springframework.boot:spring-boot-starter-data-jdbc
- org.springframework.boot:spring-boot-starter-data-jpa
- org.springframework.boot:spring-boot-starter-thymeleaf
- org.springframework.boot:spring-boot-starter-web
- org.springframework.boot:spring-boot-starter-security
- org.thymeleaf.extras:thymeleaf-extras-springsecurity5
- org.mybatis.spring.boot:mybatis-spring-boot-starter:2.2.1
- org.projectlombok:lombok
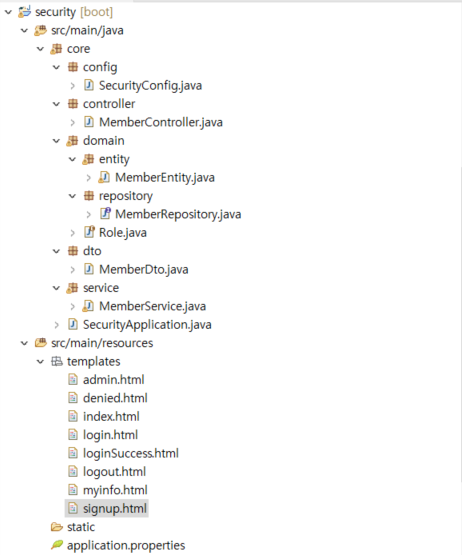
[프로젝트 구조]
- Spring Security 설정
먼저 이 글의 핵심인 Spring Security를 설정해보도록 하겠습니다.Spring Security는 FilterChainProxy라는 이름으로 내부에 여러 Filter들이 동작하고 있습니다. ( 참고 )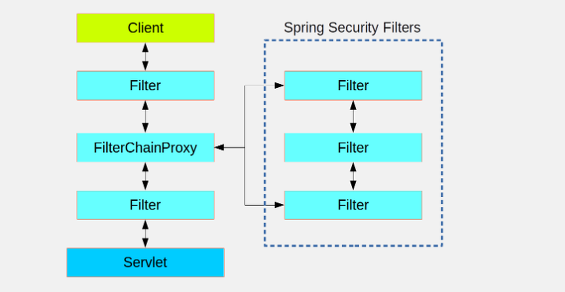
src/main/java/core/config/SecurityConfig.java
package core.config;

import lombok.AllArgsConstructor;
import org.springframework.context.annotation.Bean;
import org.springframework.context.annotation.Configuration;
import org.springframework.security.config.annotation.authentication.builders.AuthenticationManagerBuilder;
import org.springframework.security.config.annotation.web.builders.HttpSecurity;
import org.springframework.security.config.annotation.web.builders.WebSecurity;
import org.springframework.security.config.annotation.web.configuration.EnableWebSecurity;
import org.springframework.security.config.annotation.web.configuration.WebSecurityConfigurerAdapter;
import org.springframework.security.crypto.bcrypt.BCryptPasswordEncoder;
import org.springframework.security.crypto.password.PasswordEncoder;
import org.springframework.security.web.util.matcher.AntPathRequestMatcher;

import core.service.MemberService;

@Configuration
@EnableWebSecurity
@AllArgsConstructor
public class SecurityConfig extends WebSecurityConfigurerAdapter{
	private MemberService memberService;

    @Bean
    public PasswordEncoder passwordEncoder() {
        return new BCryptPasswordEncoder();
    }

    @Override
    public void configure(WebSecurity web) throws Exception
    {
        // static 디렉터리의 하위 파일 목록은 인증 무시 ( = 항상통과 )
        web.ignoring().antMatchers("/css/**", "/js/**", "/img/**", "/lib/**");
    }

    @Override
    protected void configure(HttpSecurity http) throws Exception {
        http.authorizeRequests()
                // 페이지 권한 설정
                .antMatchers("/admin/**").hasRole("ADMIN")
                .antMatchers("/user/myinfo").hasRole("MEMBER")
                .antMatchers("/**").permitAll()
            .and() // 로그인 설정
                .formLogin()
                .loginPage("/user/login")
                .defaultSuccessUrl("/user/login/result")
                .usernameParameter("email")
                .permitAll()
            .and() // 로그아웃 설정
                               .logout()
                .logoutRequestMatcher(new AntPathRequestMatcher("/user/logout"))
                .logoutSuccessUrl("/user/logout/result")
                .invalidateHttpSession(true)
            .and()
                // 403 예외처리 핸들링
                               .exceptionHandling().accessDeniedPage("/user/denied");
    }

    @Override
    public void configure(AuthenticationManagerBuilder auth) throws Exception {
        auth.userDetailsService(memberService).passwordEncoder(passwordEncoder());
    }
}
- @ EnableWebSecurity
- @Configuration클래스에 @EnableWebSecurity 어노테이션을 추가하여 Spring Security 설정할 클래스라고 정의합니다.
- 설정은 WebSecurityConfigurerAdapter 클래스를 상속받아 메서드를 구현하는것이 일반적인 방법입니다.
- WebSecurityConfigurerAdapter Class
- WebSecurityConfigurer 인스턴스를 편리하게 생성하기 위한 클래스입니다.
- passwordEncoder()
- BCryptPasswordEncoder는 Spring Security에서 제공하는 비밀번호 암호화 객체입니다.
- Service에서 비밀번호를 암호화할 수 있도록 Bean으로 등록합니다.
- configure(WebSecurity web)
- WebSecurity는 FilterChainProxy를 생성하는 필터입니다.
- web.ignoring().antMatchers("/css/**", "/js/**", "/img/**", "/lib/**");
- 해당 경로의 파일들은 Spring Security가 무시할 수 있도록 설정합니다.
- configure(HttpSecurity http)
- HttpSecurity를 통해 HTTP 요청에 대해 웹 기반 보안을 구성할 수 있습니다.
- authorizeRequests()
- HttpServletReques에 따라 접근(access)을 제한합니다.
- antMatchers()메서드를 특정 경로로 지정하며, permitAll(), hasRole(), 메서드로 역할(Role)에 따른 접근 설정을 잡아줍니다. 어떤 페이지는 관리자만 접근하고, 어떤 페이지는 회원만 접근해야할 경우 그 권한을 부여기학 위한 역할을 설정을 여기서 합니다.
- .antMatchers("/admin/**").hasRole("ADMIN")
- /admin으로 시작하는 경로는 ADMIN 롤을 가진 사용자만 접근 가능합니다.
- .antMatchers("/user/**").hasRole("MEMBER")
- /user으로 경로로 시작하는 경로는 MEMBER롤을 가진 사용자만 접근 가능합니다.
- .antMatchers("/**").permitAll()
- 모든 경로에 대해서는 권한없이 접근이 가능합니다.
- .anyRequest().authenticated()
- 모든 요청에 대해, 인증된 사용자만 접근하도록 설정할 수도 있습니다
- .antMatchers("/admin/**").hasRole("ADMIN")
- formlogin()
- form 기반으로 인증을 하도록 합니다. 로그인 정보는 기본적으로 HttpSession을 이용합니다.
- /login 경로로 접근하면, Spring Security에서 제공하는 로그인 form을 사용할 수 있습니다.
- .loginPage("/user/login")
- 기본 제공되는 form말고, 커스텀 로그인 폼을 사용하고 싶으면 loginPage() 메서드를 사용합니다.
- 이 때 커스텀 로그인 form의 action 경로와 loginPage()의 파라미터 경로가 일치해야 인증을 처리할 수 있습니다.(login.html에서 확인)
- .defaultSuccessUrl("/user/login/result")
- 로그인이 성공했을 때 이동되는 페이지이며, 마찬가지로 컨트롤러에서 URL 매핑이 되어 있어야 합니다.
- .usernameParameter("파라미터명")
- 로그인 form에서 아이디는 name=username인 input을 기본으로 인식하는데, usernameParameter() 메서드를 통해 파라미터명을 변경할 수 있습니다.
- .logout()
- .exceptionHandling().accessDeniedPage("/user/denied")
- 예외가 발생했을 때 exceptionHandling() 메서드로 핸들링할 수 있습니다.
- configure(AuthenticationManagerBuilder auth)
- Spring Security에서 모든 인증은 AuthenticationManager를 통해 이루어지며 authenticationManager를 생성하기 위해서는 AuthenticationManagerBuilder를 사용합니다.
- 로그인 처리(인증)을 위해서 UserDetailService를 통해서 필요한 정보들을 가저오는데, 예제에서는 서비스 클래스(memberService)에서 이를 처리합니다.
- 서비스에서는 UserDetailsService 인터페이스를 implements하여, loadUserByUsername() 메서드를 구현하면 됩니다.
- 비밀번호 암호화를 위해, passwordEncoder를 사용하고 있습니다.Controller / Service / Domain 구현
- Spring Security에서 모든 인증은 AuthenticationManager를 통해 이루어지며 authenticationManager를 생성하기 위해서는 AuthenticationManagerBuilder를 사용합니다.
- @ EnableWebSecurity
- Controller / Service / Domain 구현
다음으로 각 Layer들을 구현해보겠습니다.
- src/main/java/core/controller/MemberController.java
package core.controller; import lombok.AllArgsConstructor; import org.springframework.stereotype.Controller; import org.springframework.web.bind.annotation.GetMapping; import org.springframework.web.bind.annotation.PostMapping; import core.dto.MemberDto; import core.service.MemberService; @Controller @AllArgsConstructor public class MemberController { private MemberService memberService; // 메인 페이지 @GetMapping("/") public String index() { return "/index"; } // 회원가입 페이지 @GetMapping("/user/signup") public String dispSignup() { return "/signup"; } // 회원가입 처리 @PostMapping("/user/signup") public String execSignup(MemberDto memberDto) { memberService.joinUser(memberDto); return "redirect:/user/login"; } // 로그인 페이지 @GetMapping("/user/login") public String dispLogin() { return "/login"; } // 로그인 결과 페이지 @GetMapping("/user/login/result") public String dispLoginResult() { return "/loginSuccess"; } // 로그아웃 결과 페이지 @GetMapping("/user/logout/result") public String dispLogout() { return "/logout"; } // 접근 거부 페이지 @GetMapping("/user/denied") public String dispDenied() { return "/denied"; } // 내 정보 페이지 @GetMapping("/user/info") public String dispMyInfo() { return "/myinfo"; } // 어드민 페이지 @GetMapping("/admin") public String dispAdmin() { return "/admin"; } } - src/main/java/core/service/MemberService.java
package core.service;


import lombok.AllArgsConstructor;
import org.springframework.security.core.GrantedAuthority;
import org.springframework.security.core.authority.SimpleGrantedAuthority;
import org.springframework.security.core.userdetails.User;
import org.springframework.security.core.userdetails.UserDetails;
import org.springframework.security.core.userdetails.UserDetailsService;
import org.springframework.security.core.userdetails.UsernameNotFoundException;
import org.springframework.security.crypto.bcrypt.BCryptPasswordEncoder;
import org.springframework.stereotype.Service;
import org.springframework.transaction.annotation.Transactional;

import core.domain.Role;
import core.domain.entity.MemberEntity;
import core.domain.repository.MemberRepository;
import core.dto.MemberDto;

import java.time.LocalDateTime;
import java.util.ArrayList;
import java.util.List;
import java.util.Optional;

@Service
@AllArgsConstructor
public class MemberService implements UserDetailsService {
	private MemberRepository memberRepository;

	 @Transactional
    public Long joinUser(MemberDto memberDto) {
        // 비밀번호 암호화
        BCryptPasswordEncoder passwordEncoder = new BCryptPasswordEncoder();
        memberDto.setPassword(passwordEncoder.encode(memberDto.getPassword()));

        // 생성일자와 수정일자 생성
        memberDto.setCreatedDate(LocalDateTime.now());
        memberDto.setUpdatedDate(LocalDateTime.now());

        return memberRepository.save(memberDto.toEntity()).getId();
    }

	@Override
	public MemberEntity loadUserByUsername(String userEmail) throws UsernameNotFoundException {

        Optional<MemberEntity> userEntityWrapper = memberRepository.findByEmail(userEmail);
        MemberEntity userEntity = userEntityWrapper.get();

        return userEntity;
	}


}
- joinUser()
- 회원가입을 처리하는 메서드이며, 비밀번호를 암호화하여 저장합니다.
- loadUserByUsername()
- 상세 정보를 조회하는 메서드이며, 사용자의 계정정보와 권한을 갖는 UserDetails 인터페이스를 반환해야합니다.(예제에서는 UserDetails를 상속받은 MemberEntity를 반환)
- 매개변수는 로그인시 입력한 아이디인데, 엔티티의 PK를 뜻하는게 아니고 유저를 식별할 수 있는 어떤 값을 의미합니다. Spring Security에서는 username라는 이름으로 사용합니다.
- 예제에서는 아이디가 이메일이며, form 양식에서 name="username" 혹은 config에서 설정한 파라미터를 name="파라미터"로 요청해야합니다.
- joinUser()
- src/main/java/core/domain/Role.java
package core.domain; import lombok.AllArgsConstructor; import lombok.Getter; @AllArgsConstructor @Getter public enum Role { ADMIN("ROLE_ADMIN"), MEMBER("ROLE_MEMBER"); private String value; }- Service에서 사용하는 Enum객체입니다.
- src/main/java/core/domain/repository/MemberRepository.java
package core.domain.repository; import java.util.Optional; import org.springframework.data.jpa.repository.JpaRepository; import core.domain.entity.MemberEntity; public interface MemberRepository extends JpaRepository<MemberEntity, Long> { Optional<MemberEntity> findByEmail(String userEmail); }- Email을 Where 조건절로 하여, 데이터를 가져올 수 있도록 findByEmail() 메서드를 정의합니다.
- src/main/java/core/dto/MemberDto.java
package core.dto; import lombok.*; import java.time.LocalDateTime; import core.domain.entity.MemberEntity; @Getter @Setter @ToString @NoArgsConstructor public class MemberDto { private Long id; private String email; private String password; private String userName; private String gender; private Integer age; private String auth; private LocalDateTime createdDate; private LocalDateTime updatedDate; public MemberEntity toEntity(){ return MemberEntity.builder() .id(id) .email(email) .password(password) .userName(userName) .gender(gender) .age(age) .auth(auth) .createdDate(createdDate) .updatedDate(updatedDate) .build(); } @Builder public MemberDto(Long id, String email, String password,String userName,String gender,Integer age,String auth,LocalDateTime createdDate,LocalDateTime updatedDate) { this.id = id; this.email = email; this.password = password; this.userName = userName; this.gender = gender; this.age = age; this.auth = auth; this.createdDate = createdDate; this.updatedDate = updatedDate; } } - src/main/java/core/domain/entity/MemberEntity.java
package core.domain.entity; import lombok.AccessLevel; import lombok.Builder; import lombok.Getter; import lombok.NoArgsConstructor; import java.time.LocalDateTime; import java.util.Collection; import java.util.HashSet; import java.util.Set; import javax.persistence.*; import org.springframework.data.annotation.CreatedDate; import org.springframework.data.annotation.LastModifiedDate; import org.springframework.security.core.GrantedAuthority; import org.springframework.security.core.authority.SimpleGrantedAuthority; import org.springframework.security.core.userdetails.UserDetails; @NoArgsConstructor(access = AccessLevel.PROTECTED) @Getter @Entity @Table(name = "member") public class MemberEntity implements UserDetails { @Id @GeneratedValue(strategy= GenerationType.IDENTITY) private Long id; @Column(length = 20, nullable = false) private String email; @Column(length = 100, nullable = false) private String password; @Column(length = 100, nullable = false) private String userName; @Column(length = 1, nullable = true) private String gender; @Column(length = 3, nullable = true) private Integer age; @Column(length = 100, nullable = false) private String auth; @CreatedDate private LocalDateTime createdDate; @LastModifiedDate private LocalDateTime updatedDate; @Builder public MemberEntity(Long id, String email, String password, String userName,String gender,Integer age,String auth,LocalDateTime createdDate,LocalDateTime updatedDate) { this.id = id; this.email = email; this.password = password; this.userName = userName; this.gender = gender; this.age = age; this.auth = auth; this.createdDate = createdDate; this.updatedDate = updatedDate; } @Override public Collection<? extends GrantedAuthority> getAuthorities() { Set<GrantedAuthority> roles = new HashSet<>(); for (String role : auth.split(",")) { roles.add(new SimpleGrantedAuthority(role)); } return roles; } @Override public String getUsername() { return userName; } // 계정 만료 여부 반환 @Override public boolean isAccountNonExpired() { // 만료되었는지 확인하는 로직 return true; // true -> 만료되지 않았음 } // 계정 잠금 여부 반환 @Override public boolean isAccountNonLocked() { // 계정 잠금되었는지 확인하는 로직 return true; // true -> 잠금되지 않았음 } // 패스워드의 만료 여부 반환 @Override public boolean isCredentialsNonExpired() { // 패스워드가 만료되었는지 확인하는 로직 return true; // true -> 만료되지 않았음 } // 계정 사용 가능 여부 반환 @Override public boolean isEnabled() { // 계정이 사용 가능한지 확인하는 로직 return true; // true -> 사용 가능 } }- MemberEntity는 UserDetails를 상속받아서 구현합니다. UserDetails에서 필수적으로 상속받아야하는 메서드는 아래와 같습니다.
- getAuthorities() : 사용자의 권한을 콜렉션 형태로 반환합니다(클래스 자료형은 GrantedAuthority를 구현해야합니다.)
- getUsername() : 사용자의 id를 반환합니다(ID를 매핑해서 return하면 됩니다)
- getPassword() : 사용자의 password를 반환합니다.
- isAccountNonExpired() : 계정만료 여부를 반환합니다(true = 만료되지 않음을 의미합니다.)
- isAccountNonLocked() : 계정잠금 여부를 반환합니다(true = 잠금되지 않음을 의미합니다.)
- isCredentialsNonExpired() : 패스워드 만료 여부 반환합니다(true = 만료되지 않암을 의미합니다.)
- isEnabled() : 계정사용 가능여부를 반환합니다(true = 사용가능을 의미합니다.)
- getAuthorities() 메서드는 사용자 권한을 Collection 형태로 반환해야하므로, Collection의 자료형은 무조건 GrantedAuthority를 구현해야합니다.
- 권한이 중복적으로 생성되지 않도록 Set<GrantedAuthority>를 사용했습니다.
- 권한정보가 ROLE_ADMIN,ROLE_MEMBER와 같은 형태로 전달 될 것이기에, 쉼표(,)를 기준으로 잘라서 ROLE_ADMIN과 ROLE_MEMBER를 roles에 추가합니다.
- MemberEntity는 UserDetails를 상속받아서 구현합니다. UserDetails에서 필수적으로 상속받아야하는 메서드는 아래와 같습니다.
- src/main/java/core/controller/MemberController.java
- 화면단 구현
마지막으로 HTML을 구현해보도록 하겠습니다.
- src/main/resources/templates/admin.html
<!DOCTYPE html> <html lang="en"> <head> <meta charset="UTF-8"> <title>어드민</title> </head> <body> <h1>어드민 페이지입니다.</h1> <hr> </body> </html> - src/main/resources/templates/denied.html
<!DOCTYPE html> <html lang="en"> <head> <meta charset="UTF-8"> <title>접근 거부</title> </head> <body> <h1>접근 불가 페이지입니다.</h1> <hr> </body> </html> - src/main/resources/templates/index.html
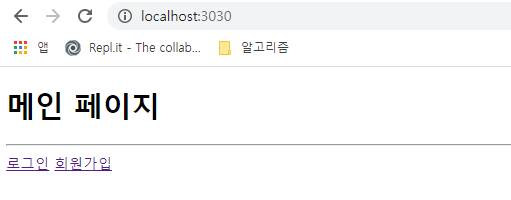
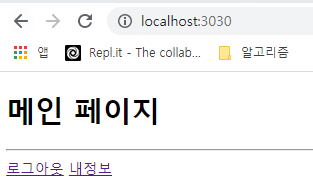
<!DOCTYPE html> <html lang="en" xmlns:th="http://www.w3.org/1999/xhtml" xmlns:sec="http://www.w3.org/1999/xhtml"> <head> <meta charset="UTF-8"> <title>메인</title> </head> <body> <h1>메인 페이지</h1> <hr> <a sec:authorize="isAnonymous()" th:href="@{/user/login}">로그인</a> <a sec:authorize="isAuthenticated()" th:href="@{/user/logout}">로그아웃</a> <a sec:authorize="isAnonymous()" th:href="@{/user/signup}">회원가입</a> <a sec:authorize="hasRole('ROLE_MEMBER')" th:href="@{/user/info}">내정보</a> <a sec:authorize="hasRole('ROLE_ADMIN')" th:href="@{/admin}">어드민</a> </body> </html>
- sec:authorize를 사용하여, 사용자의 Role에 따라 보이는 메뉴를 다르게 합니다.
- isAnonymous()
- 익명의 사용자일 경우, 로그인, 회원가입, 버튼을 노출합니다.
- isAuthenticated()
- 인증된 사용자일경우, 로그아웃 버튼을 노출줍니다.
- hasRole()
- 특정 롤을 가진 사용자에 대해, 메뉴를 노출합니다.
- isAnonymous()
- sec:authorize를 사용하여, 사용자의 Role에 따라 보이는 메뉴를 다르게 합니다.
- src/main/resources/templates/login.html
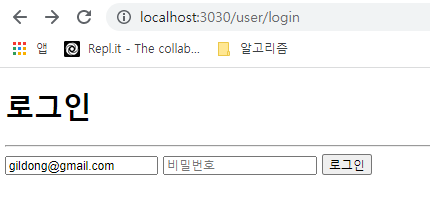
<!DOCTYPE html> <html lang="en" xmlns:th="http://www.w3.org/1999/xhtml"> <head> <meta charset="UTF-8"> <title>로그인 페이지</title> </head> <body> <h1>로그인</h1> <hr> <form action="/user/login" method="post"> <input type="hidden" th:name="${_csrf.parameterName}" th:value="${_csrf.token}" /> <input type="text" name="email" placeholder="이메일 입력해주세요"> <input type="password" name="password" placeholder="비밀번호"> <button type="submit">로그인</button> </form> </body> </html>
- <input type="hidden" th:name="${_csrf.parameterName}" th:value="${_csrf.token}" />
- form에 히든 타입으로 csrf 토큰 값을 넘겨줍니다.
- Spring Security가 적용되면 POST방식으로 보내는 모든 데이터는 csrf토큰값이 필요합니다(뒤에서 살펴 볼 join.html에서는 편리한 방법을 사용하고 있습니다.)
- 토큰값이 없는 상태에서 form을 전송할 경우, 컨트롤러에 POST 메서드를 매핑할 수 없다는 에러가 발생하니 빼먹지 않도록 합니다.
(error : HttpRequestMethodNotSupportedException: Request method 'POST')
- 토큰값이 없는 상태에서 form을 전송할 경우, 컨트롤러에 POST 메서드를 매핑할 수 없다는 에러가 발생하니 빼먹지 않도록 합니다.
- <input type="text" name="email" placeholder="이메일 입력해주세요">
- 로그인 시 아이디의 name attribute값은 username 또는 config파일에 설정한 파라미터값을 입력해야합니다.
- <input type="hidden" th:name="${_csrf.parameterName}" th:value="${_csrf.token}" />
- src/main/resources/templates/loginSuccess.html
<!DOCTYPE html> <html lang="en" xmlns:sec="" xmlns:th="http://www.w3.org/1999/xhtml"> <head> <meta charset="UTF-8"> <title>로그인 성공</title> </head> <body> <h1>로그인 성공!!</h1> <hr> <p> <span sec:authentication="name"></span>님 환영합니다~ </p> <a th:href="@{'/'}">메인으로 이동</a> </body> </html>
- sec:authentication="name"
- username값을 가져옵니다.
- sec:authentication="name"
- src/main/resources/templates/logout.html
<!DOCTYPE html> <html lang="en" xmlns:th="http://www.w3.org/1999/xhtml"> <head> <meta charset="UTF-8"> <title>로그아웃</title> </head> <body> <h1>로그아웃 처리되었습니다.</h1> <hr> <a th:href="@{'/'}">메인으로 이동</a> </body> </html> - src/main/resources/templates/myinfo.html
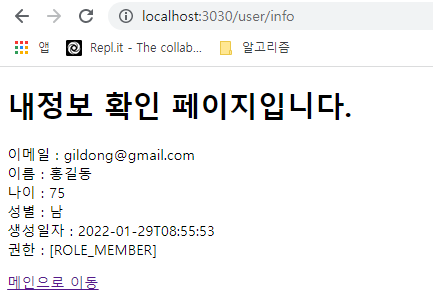
<!DOCTYPE html> <html lang="en"> <head> <meta charset="UTF-8"> <title>내정보</title> </head> <body> <h1>내정보 확인 페이지입니다.</h1> <p> <div> 이메일 : <span sec:authentication="principal.email"></span> </div> <div> 이름 : <span sec:authentication="principal.username"></span> </div> <div> 나이 : <span sec:authentication="principal.age"></span> </div> <div> 성별 : <span sec:authentication="principal.gender" id="gender" var="gender">${gender}</span> </div> <div> 생성일자 : <span sec:authentication="principal.createdDate"></span> </div> <div> 권한 : <span sec:authentication="authorities"></span> </div> </p> <a th:href="@{'/'}">메인으로 이동</a> </body> <script> if (document.getElementById("gender").innerText == 'Y'){ document.getElementById("gender").innerText = '남'; }else{ document.getElementById("gender").innerText = '여'; } </script> </html>
- 내정보에서 Spring Security를 통해 회원가입한 정보를 가져올 수 있습니다.
- sec:authentication="principal"은 Service에서 반환한MemberEntity로 원하는 값을 출력할 수 있습니다.
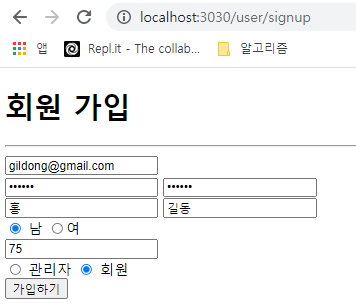
- src/main/resources/templates/signup.html
<!DOCTYPE html> <html lang="en" xmlns:th="http://www.w3.org/1999/xhtml"> <head> <meta charset="UTF-8"> <title>회원가입 페이지</title> </head> <body> <h1>회원 가입</h1> <hr> <form th:action="@{/user/signup}" method="post" onsubmit="return formSubmit();"> <input type="text" name="email" placeholder="이메일" required> <div> <input type="password" name="password" placeholder="비밀번호" onchange="checkPwd()" required> <input type="password" name="confirmPassword" placeholder="비밀번호 확인" onchange="checkPwd()" required> <span type="text" name="passwordMessage"/> </div> <div> <input type="text" id="lastName" name="lastName" placeholder="홍"> <input type="text" id="firstName" name="firstName" placeholder="길동"> <input type="hidden" id="userName" name="userName"> </div> <div> <input type="radio" name="gender" value="Y" checked="checked"> 남 <input type="radio" name="gender" value="X">여 <br> </div> <div> <input type="number" name="age" placeholder="나이"> </div> <div> <input type="radio" name="auth" value="ROLE_ADMIN,ROLE_MEMBER"> 관리자 <input type="radio" name="auth" value="ROLE_MEMBER" checked="checked"> 회원 <br> </div> <button type="submit">가입하기</button> </form> </body> <script> function checkPwd(){ var pwd = document.getElementsByName("password")[0]; var cfmPwd = document.getElementsByName('confirmPassword')[0]; if(pwd.value != '' && cfmPwd.value !=''){ if(pwd.value!=cfmPwd.value){ document.getElementsByName("passwordMessage")[0].innerText = "비밀번호가 일치하지 않습니다"; }else{ document.getElementsByName("passwordMessage")[0].innerText = ""; } }else if(pwd.value == ''){ document.getElementsByName("passwordMessage")[0].innerText = "비밀번호를 입력해주세요."; }else if(cfmPwd.value == ''){ document.getElementsByName("passwordMessage")[0].innerText = "확인 비밀번호를 입력해주세요."; } } function formSubmit(){ var fName = document.getElementById('lastName').value; var lName = document.getElementById('firstName').value; var userName = document.getElementById('userName'); userName.value = fName+lName; if(document.getElementsByName("passwordMessage")[0].innerText!=""){ alert("비밀번호를 확인해 주세요"); return false; } } </script> </html>
- src/main/resources/templates/admin.html
- 테스트


추후 회원가입시 비밀번호검증, 아이디 존재여부체크 등 다양한 기능을 찾아 글을 작성해보도록 하겠습니다.
[참고자료]
https://victorydntmd.tistory.com/328
[SpringBoot] Spring Security를 이용한 회원가입/로그인/로그아웃
이번 글에서는 Spring Security를 이용하여 회원가입 및 로그인을 구현해보도록 하겠습니다. 전체 코드는 깃헙을 참고하시길 바랍니다. 개발환경 IntelliJ 2019.02 Java 11 SpringBoot 2.1.9 Gradle 5.6 라이브..
victorydntmd.tistory.com
반응형