[Spring Boot] Thymeleaf 사용하기
안녕하세요. 개발자 Jindory입니다.
오늘은 Thymeleaf 사용법에 대해서 알아보고자 합니다.

1. Thymeleaf란
Thymeleaf는 서버측 View Template Engine입니다. 그리고 컨트롤러에서 전달받은 데이터를 이용해 동적인 페이지를 만들 수 있습니다. 태그의 속성으로 thymeleaf 명령어를 사용할 수 있으며 html 파일 내에서 사용이 가능합니다.
2. Thymeleaf 적용
1) Thymeleaf 설정
Thymeleaf는 maven과 gradle에서 각각 아래와 같이 추가하여 설정할 수 있습니다.
// maven
<dependency>
  <groupId>org.springframework.boot</groupId>
  <artifactId>spring-boot-starter-thymeleaf</artifactId>
</dependency>
// gradle
dependencies {
// Thymeleaf
implementation 'org.springframework.boot:spring-boot-starter-thymeleaf'
}2) Controller와 HTML 코드
[ Controller ]
import java.util.ArrayList;
import java.util.HashMap;
import java.util.List;
import java.util.Map;

import org.springframework.stereotype.Controller;
import org.springframework.web.bind.annotation.GetMapping;
import org.springframework.web.servlet.ModelAndView;

@Controller
public class HomeController {

	@GetMapping("/home")
	public ModelAndView indexPage() {
		ModelAndView mv = new ModelAndView("/common/introduce");

		Map<String,Object> person1 = new HashMap<>();
		person1.put("lastName", "Hong");
		person1.put("firstName", "Gildong");
		person1.put("age",42);
		person1.put("gender", "M");
		person1.put("address","서울시 서대문구");
		person1.put("job",null);

		Map<String,Object> person2 = new HashMap<>();
		person2.put("lastName", "Hong");
		person2.put("firstName", "Marsun");
		person2.put("age",19);
		person2.put("gender", "F");
		person2.put("address","서울시 서대문구");
		person2.put("job","학생");

		List<String> likes1 = new ArrayList<String>();
		likes1.add("vollyball");
		likes1.add("drama");
		likes1.add("movie");
		likes1.add("jogging");
		likes1.add("fruit");

		List<String> likes2 = new ArrayList<String>();
		likes2.add("draw");
		likes2.add("drama");
		likes2.add("movie");
		likes2.add("animal");
		likes2.add("meat");

		mv.addObject("person1",person1);
		mv.addObject("person2",person2);
		mv.addObject("likes1",likes1);
		mv.addObject("likes2",likes2);

		return mv;
	}
}
[ HTML(Thymeleaf) ]
<!DOCTYPE html>
<html lang="ko" xmlns:th="http://www.thymeleaf.org">
<head>
<meta charset="UTF-8">
<title>Thymeleaf Introduce</title>
</head>
<body>
	<h1 th:text="${person1.lastName}"></h1>
	<h1 th:text="${person1.firstName}"></h1>
	<h1 th:text="${person1.age}"></h1>

	<input type="text" th:value="${person1.address}">
	<br>
	<th:block th:if="${person1.age>20}">성인</th:block>
	<th:block th:unless="${person1.age>20}">미성년자</th:block>

	<th:block th:switch="${person1.gender}">
		<div th:case="F">여성</div>
		<div th:case="M">남성</div>
	</th:block>

	<th:block th:if="${#strings.isEmpty(person1.job)}">직업 : 무직</th:block>
	<th:block th:unless="${#strings.isEmpty(person1.job)}">직업 : [[${person1.job}]]</th:block>

	<th:block th:each="like:${likes1}">
		<li th:text="${like}"></li>
	</th:block>

	<hr>

	<h1 th:text="${person2.lastName}"></h1>
	<h1 th:text="${person2.firstName}"></h1>
	<h1 th:text="${person2.age}"></h1>

	<input type="text" th:value="${person2.address}">
	<br>
	<th:block th:if="${person2.age>20}">성인</th:block>
	<th:block th:unless="${person2.age>20}">미성년자</th:block>

	<th:block th:switch="${person2.gender}">
		<div th:case="F">여성</div>
		<div th:case="M">남성</div>
	</th:block>

	<th:block th:if="${#strings.isEmpty(person2.job)}">직업 : 무직</th:block>
	<th:block th:unless="${#strings.isEmpty(person2.job)}">직업 : [[${person2.job}]]</th:block>

	<th:block th:each="like:${likes2}">
		<li th:text="${like}"></li>
	</th:block>
</body>
</html>
[ 결과화면 ]

3) Thymeleaf 문법 설명
1> Text값 표현하기
<h1 th:text="'성 : '+${person2.lastName}"></h1>
<h1 th:text="'이름 : '+${person2.firstName}"></h1>
<h1 th:text="|Age : ${person2.age}|"></h1>

<span th:inline="text">직업 : [[${person2.job}]]</span>
th:text="${변수}" / th:inline [[${변수}]]
Controller에서 넘어온 값을 ${변수}값 안에 넣고 th:text안에 표현한다.
문자열과 추가하고자 한다면 문자열+${변수}을 통해 표현하거나, '|'로 전체 표현될 문장을 감싸면 된다.
또한 [[${}]]를 통해 tag사이에 직접 입력할 수도 있다.
2> value로 표현하기
<input type="text" th:value="${person1.address}">th:value="${변수}"
th:value를 선언하고 그 안에 표현하고자 하는 값을 ${변수}안에 선언하면 된다.
3> 비교 여산자
<th:block th:if="${person1.age>20}">성인</th:block>
<th:block th:unless="${person1.age>20}">미성년자</th:block>

<th:block th:if="${#strings.isEmpty(person1.job)}">직업 : 무직</th:block>
<th:block th:unless="${#strings.isEmpty(person1.job)}">직업 : [[${person1.job}]]</th:block>
th:if="${조건1}" / th:unless="${조건1}"
위와 같이 th:if와 th:unless로 if else 구문을 thymeleaf에서 사용할 수 있다.
th:if와 th:unless에 들어가는 조건이 동일해야한다.(다르게 줄 경우 다른 조건에 따라서 코드가 실행된다.)
문자열의 경우 값이 없거나 null인 경우 #strings.isEmpty(${변수})를 통해 확인 할 수 있다.
4> switch 분기문
<th:block th:switch="${person1.gender}">
    <div th:case="F">여성</div>
    <div th:case="M">남성</div>
</th:block>
th:switch="${변수}" / th:case="조건1" th:case="조건2"
위와 같이 th:switch를 통해 분기에 조건이 될 변수를 ${변수}에 정의하고, th:case로 각 케이스에 대한 값을 넣어 분기처리가 가능하다.
5> 반복문
<th:block th:each="like:${likes1}">
    <li th:text="${like}"></li>
</th:block>
th:each="가변수:${반복변수}"
반복문은 th:each문을 선언하며, 반복할 list 객체를 ${변수}에 입력하고, 반복될 가변수를 앞에 선언하여 가변수를 반복처리한다.
반복문에서는 아래와 같은 status 속성을 사용할 수 있다.
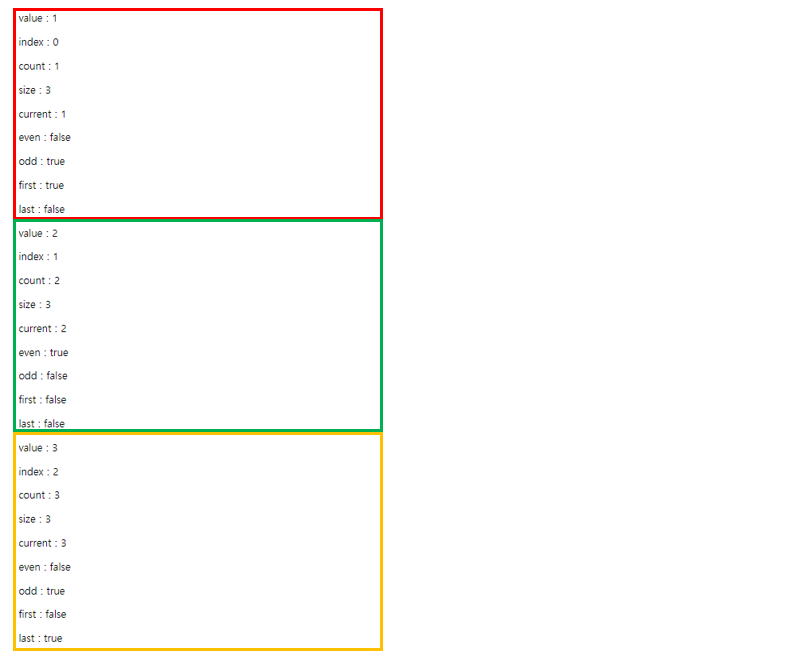
<div th:each="num,status:${#numbers.sequence(1,3)}">
    <p th:text="${'value : ' + num}"></p>
    <p th:text="${'index : ' + status.index}"></p>
    <p th:text="${'count : ' + status.count}"></p>
    <p th:text="${'size : ' + status.size}"></p>
    <p th:text="${'current : ' + status.current}"></p>
    <p th:text="${'even : ' + status.even}"></p>
    <p th:text="${'odd : ' + status.odd}"></p>
    <p th:text="${'first : ' + status.first}"></p>
    <p th:text="${'last : ' + status.last}"></p>
</div>
Index는 0부터 시작해서 size-1까지 값을 가지고 있는 속성이다.
count는 1부터 시작해서 size까지 값을 가지고 있는 속성이다.
size는 총 개수
current : 현재 index의 변수를 표현하는 속성이다.
even / odd : 값이 짝수인자 홀수인지에 따라서 true/false를 반환하는 속성이다.
first / last : 반복문의 처음인지 마지막인지에 따라서 true/false를 반환하는 속성이다.
결과는 아래와 같다.
조건문, 분기문, 반복문에 포함된 태그에 th:block가 포함되어 있는것을 알 수 있는데, th:block는 브라우저에서 인식하지 못 하는 태그이다. 조건문은 tag로 인식되어 HTML에 표시되면 안 되기 때문에 th:block를 사용해야만 한다.
이것은 분기문, 반복문에도 동일하게 적용되는 사실이다.
이것으로 Thymeleaf에 대해서 알아봤습니다.
혹시라도 정정할 내용이나 추가적으로 필요하신 정보가 있다면 댓글 남겨주시면 감사하겠습니다.
오늘도 Jindory 블로그에 방문해주셔서 감사합니다.
[ 참고 ]
https://bamdule.tistory.com/216